You've set up your hiring template in GoCo...business is booming and you need to add someone to your team. Here’s how:
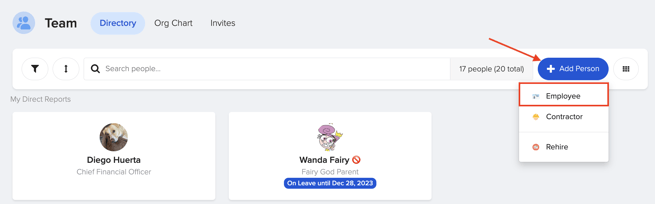
- Log in to your GoCo account and go to your Team page
- Click the + Add Person button and choose "employee" from the drop-down that appears to start adding them to your team.
- Fill in some basic information about your employee then select which Hiring Workflow you would like to use. (For more information on Hiring Workflows, click here!)
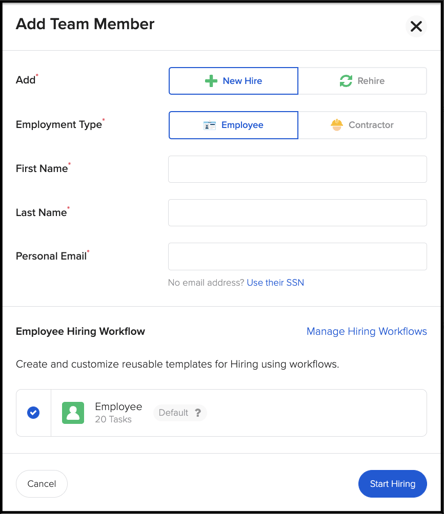
- You will then be taken into the hiring workflow where you will continue to add in the required information about your employee.
- Work Information: Here you will input the new employee's Start Date, Work Location, Division (if enabled), Department, Manager, & Company Class.
- Please note that your options for the Department that will be available depend on what Division you select. To edit what options are available for each Division, visit your Work Groups app from the Company Homepage.

Note: You have the option to make the new employee a test employee. If selected, they will be excluded from reports, payroll sync, benefit sync, and all integrations. The purpose of the test employee is to test things like: onboarding, documents, benefit enrollment, and time off. For more detailed nstructions on creating a test employee, click here.
- Please note that your options for the Department that will be available depend on what Division you select. To edit what options are available for each Division, visit your Work Groups app from the Company Homepage.
- Custom Fields: Fill in the required information and any other information relevant to the new employee. If you are not seeing a custom field that you are expecting to see, chances are that field is not added to the Hiring Workflow you selected. No worries though, you can still add the field at this step.
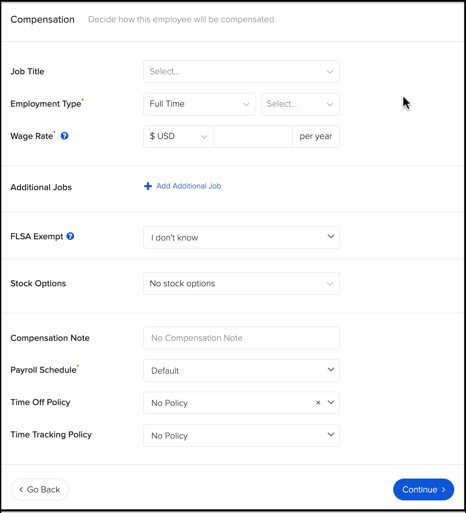
- Compensation: This is where you can select the employee's Job Title, Employment Type, Wage Type (hourly rate/annual salary), Additional Jobs, Stock Options, Time Off/Time Tracking Policies (when applicable), and Payroll Schedule. Note, that here you can also add multiple jobs & wages for this employee.
- Assign Work Groups (if applicable): Work Groups serve as logical categories that mirror the structure of your organization, including elements such as location, department, and division. GoCo also provides the flexibility to create custom work groups that can represent projects, jobs, customers, or cost centers. Once these groups are established and defined their relationships with each other, you can easily select them during this process.
- It's important to note that Work Groups are organized hierarchically, which means you must select them in a specific order. For instance, you cannot choose a task or project until you’ve first designated which customers the employee is authorized to work with.

- It's important to note that Work Groups are organized hierarchically, which means you must select them in a specific order. For instance, you cannot choose a task or project until you’ve first designated which customers the employee is authorized to work with.
- Automatic Allocations: If your Hiring Workflow includes automatic allocations, you will have the option to configure them at this stage. Automatic allocations are beneficial when your new team member will not be manually tracking their time across work groups, allowing for streamlined reporting of costs by category. Keep in mind that the sum of your allocations must equal 100%. For additional details on Labor Allocations, please refer to this help article.

- Offer Letter: Now add the offer letter…or don’t, it’s up to you. You can use our Magic Doc template or upload your own. Want to know more about Magic Docs? Visit our Magic Docs Help Center, here!
- Documents: Almost there! You will now have a chance to add any other documents you want your new employee to sign or acknowledge. We automatically add Form I-9, Form W-4, and any other default documents you added to your custom Hiring Workflow. If for some reason you need to remove a document you don't need, simply click the “x”.
- If you have remote I-9 verification enabled, you will be asked to select who will verify the 1-9 document. To do this, click "Start".

- Select who will verify the I-9 and click "Save".
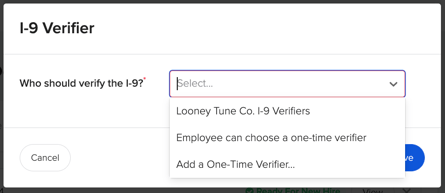
**You can even add information for a one-time verifier.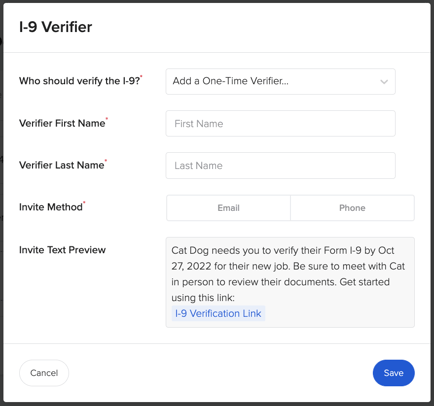
- If you have remote I-9 verification enabled, you will be asked to select who will verify the 1-9 document. To do this, click "Start".
- Benefits: Here is where you want to review benefit eligibility and grab the benefit preview link to send to your new employee.
- Workflows: Have another applicable workflow you want to kick off after you hire this employee? Add it here! Think training workflows, or internal admin tasks related to hiring, etc. For more information about workflows in workflows, click here!
- Review: Review all of the employee information carefully and then invite your new team member to GoCo!
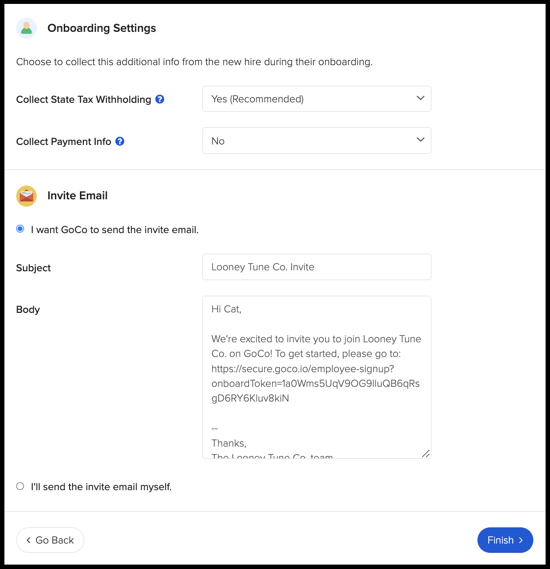
- ❗Pay special attention to "Onboarding Settings". This will determine whether or not the employee is prompted to enter state tax withholding and payment information.
- Not ready to invite them just yet? Click "I'll send the invite email myself". You can always go back to the employee's profile to grab that onboarding link and send the invite later!
That’s it! It's now your employee’s turn to onboard with GoCo. 🎉
Happy Hiring! 💚
Have additional questions? Email us at support@goco.io.