How Do I Set Up and Customize a Performance Review?
Step-by-step process on how to create a performance review from scratch.
Access Performance from your Company Home Page or your Navigation tabs on the left side of your screen.

Quickly navigate through the article using the links below
Setup Template
- From the Overview page navigate to the "Templates" tab at the top of the page.

- To create a new template select the "New Review" button.

- A pop-up will appear with the option to either "Create from Scratch" or "Choose from library". In this case, we will click on "Create from Scratch".

📌 To learn about downloading a template from the library and customizing it click here.
- GoCo will then prompt you to name your review, provide a description, and personalize an icon. Select "Save and Continue" when complete.

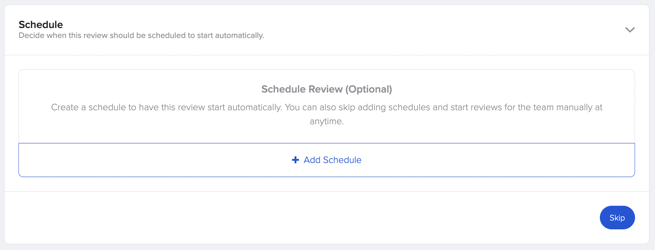
- The next step is optional. If you would like to set a schedule for this review to automatically start you can set it here or you can select "Skip". You can always come back to this step later by selecting the settings tab at the top of the page.

To learn more about automating your performance review schedule click here.
- Next, confirm your Notifications. Notifications will be set to automatic (default preferences) but if you wish to set custom notifications, follow the link from the dropdown for more information.

-
Take a moment to review the Permissions section, which controls who can access this template. Keep in mind that these permissions were initially set in the Permissions app. Click here to make any adjustments to your Company Permissions.

- Select "Continue" to begin creating your review!
Create Review
-
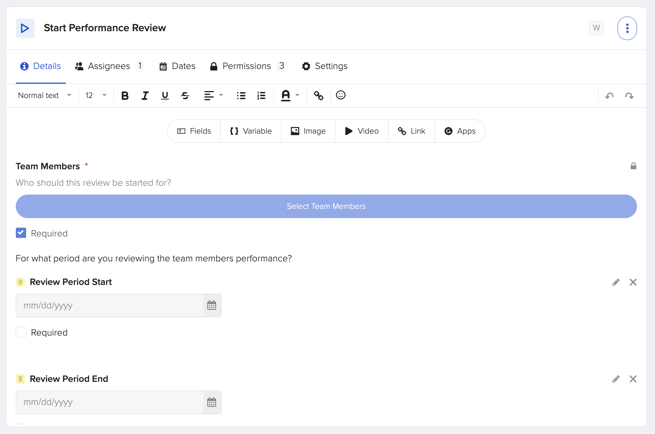
Customize the Performance Review Start Form.
By default, GoCo has the trigger set to select a team member to initiate the review process and includes two pre-made date fields to specify the review period for evaluating your team members' performance.

🌟 Pro Tip: if you choose to modify or add information to the Start Form for the Review Starter to fill out, automatically scheduling the review will not be possible. The date fields/ added fields may prevent the review from progressing due to the necessary information required to kickstart it.
to learn more about customizing the start form click here.
-
Add or Reorder Tasks
By default, GoCo will have two pre-made tasks set. The "Employee Self Review" and "Manager Review" which you will find on the left side of your screen. You have the option to keep or delete these tasks.
🌟 Pro Tip: You can change the order of these tasks by hovering your mouse over the task numbers clicking and dragging to the order you desire. To add additional tasks to the order click the "+ Task" button at the bottom of the column.
-
Customize a Task
Clicking on a task will open up the task builder on the right side of your screen, allowing you to personalize your Performance Review Task by adding form fields, variable fields, links, images, and much more!
- When setting up a task, it's common to start by adding Variable fields. These fields serve as personalized placeholders for information like "Employee Name" and "Manager Name". For instance, you can begin with a greeting like "Hello [Employee's Full Legal Name], Congrats, you've been at our company for 30 days! Please fill out the following questions, so that your manager, [Manager's Legal First Name], can review!"

🌟 Pro tip: You can pull over information as a variable field that you collected with a previous custom field or performance field. (ex. pulling over a team member's self-rating for the manager to see when providing their own rating.

- By clicking the "Fields" button you have the option to include Custom Fields & Performance Fields (aka form fields). When the task is started, the Task Assignee is asked to fill in the Form Field data. Custom Fields are linked to the employee's profile while Performance Fields live in this specific performance review.

For example, you might add a Performance Field as an "Opinion Scale" to ask the team member to rate their Job Knowledge.
After adding the field, it will be displayed in the task builder in this format.
📌 To learn more about the full functionally of performance fields click here.
⚠️ Important Note: To avoid confusion, please remember that each performance field should only be used once. For example, if you are creating a workflow to gather feedback from both employees and managers, you should have two separate tasks—one for each assignee—and two distinct performance fields within those tasks. Re-using the same field will lead to duplicate answers from the first user who fills it out. - Insert Links into a review template.
 Anytime a company needs to have a Task Assignee go to an external website, using a link is a great option.
Some link ideas are:
- Visiting a training website
- Linking to a website where an account needs to be provisioned/reviewed
- Linking to a video/image or other type of content pertinent to the task. - Add Images or Videos to your review. Maybe a company logo?

- When setting up a task, it's common to start by adding Variable fields. These fields serve as personalized placeholders for information like "Employee Name" and "Manager Name". For instance, you can begin with a greeting like "Hello [Employee's Full Legal Name], Congrats, you've been at our company for 30 days! Please fill out the following questions, so that your manager, [Manager's Legal First Name], can review!"
-
Add Goals to the review template. [optional]
When you add the Goals app to a task. Task Assignees will be asked to Create New Goals or Reference Existing Goals.- Click on the "Apps" button to reveal a drop down where you can add Goals.

- The pop-up will then prompt you to choose between the two options available.

- Example of what the Goals feature looks like in a review.

📌 To learn more about how to use the Goals feature and the employee perspective click here
- Click on the "Apps" button to reveal a drop down where you can add Goals.
-
Adjust Task Assignees
Here, you'll see a drop-down where you can select all applicable parties for the task. In that list, you will find a list of dynamic assignees. To add one, simply click on the dynamic assignee you want to be assigned! You can assign multiple if you'd like. To learn more about Dynamic Assignees click here.
 -
Adjust Dates [optional]
Enable the options to access a variety of customization choices for start dates and due dates.

Note: Due Dates are dynamic and based on other dates in GoCo. This is because setting a fixed date does not make sense for a template, because the Due Date needs to be driven based on the timing of the Review itself. Once a Review Starts, the Due Date is auto-populated based on the rule set here.
-
Assign Permissions for this specific task [optional]
Review and choose the individuals you want to grant viewing or editing permissions for this task. By default, the assignee and FAA will have access to view and complete the task.
-
Repeat this process until you've added and customized all your tasks for each assignee you have involved in the review.
-
Navigate to the Fields tab at the top of your screen [advanced step]
- The Fields tab summarizes ALL the form fields being used within a Performance Review. This gives admins a way to audit and view all the data for a Performance Review in a single place, without having to click around through tasks. The page tells you how many tasks each field is being used in. You can edit all fields in this tab.

- The Fields tab summarizes ALL the form fields being used within a Performance Review. This gives admins a way to audit and view all the data for a Performance Review in a single place, without having to click around through tasks. The page tells you how many tasks each field is being used in. You can edit all fields in this tab.
- Review & Publish: Once your done customizing the template, click "Review and Publish" at the top right of the screen.

Once your template is created, you can distribute it to your employees for completion. Please keep in mind that any modifications made to the template after it has been published and sent to an employee will not apply to reviews already in progress. To implement any changes, you will need to republish the template, delete the old instances, and then resend it to the relevant employees.
Happy Review Building! 🦖
If you have any additional questions, please reach out to your GoCo Client Success Team or email us at support@goco.io.