How to Create Custom Payroll Reports
Need to customize a payroll report in GoCo? Here’s a step-by-step guide on setting one up!
Use these links to navigate within this article.
- Accessing Payroll Reports
- Customizing Payroll Reports
- Accessing Saved Payroll Reports
- Editing Existing Report
- Crash Course
Accessing Payroll Reports
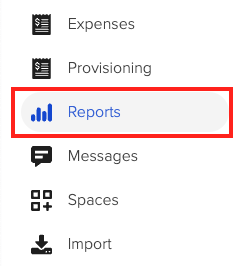
1. Log in to GoCo and click on Reports on the left-hand navigation.
GoCo’s Reports Module includes both Standard Reports and Custom Reports.

- Standard Reports: Pre-made reports generated by GoCo, such as Time Off and Time Tracking reports.
- Custom Reports: Where your saved reports live. You can create new reports to capture specific payroll information, including fields from Custom Fields, Workflow Fields, and more.
2. Starting Your Custom Payroll Report

Click the blue “+ Add Report” button either at the top right of your screen or next to the Custom Reports label.
3. Choosing Your Report Type
Select "Create a Report from Scratch" (or copy an existing report if it’s similar to what you need). In this case, we’ll create from scratch to set up a Payroll report. Select Payroll as your Report Type. Payroll Data Reports focus on payroll-specific details, where each row reflects a payroll run. This allows you to capture and analyze payroll cycles individually.

Customizing a Payroll Report
1. Naming & Describing Your Report
Once you've selected your report type, you'll be on the customization screen. Here you can name your report and add a description that highlights its purpose. 
2. Setting Up Basic Fields
Choose the Report Fields (columns) to include. This is where you can add payroll-specific columns like:
- Payroll Date
- Gross Pay Total
- Deductions
- Net Pay Total
- Status (e.g., processed, pending)

Note: You’ll see “Payroll Dates”, “Payroll Type”, and "Team Member" by default.
3. Time Period
Select a Date Range
- All-Time, Last 30 Days, Last 60 Days, Last 90 Days, Month, Quarter, Year, Year to Date (YTD), Custom Date(s)
Then select how you'd like to Show Data Based On:
- "Pay Period Start Date" - The first day of a pay period during which employees are actively working and accumulating earnings.
- "Pay Period End Date" - The last day of a pay period. It represents the cutoff point for the time worked or pay accrued within that period.
- "Pay Period Pay Date" - The actual date on which employees receive their pay for the previous pay period.
Most users will use the "Pay Period Pay Date" option. Take note of these filters as you may want to adjust them over time when reusing this report.

4. Applying Filters
Next, choose filters to refine which team members will be included—you can select from "All Employees," "Active Team Members," "Pending Team Members," and "Terminated Employees." You can also choose to layer these groups, however you are limited to only combining groups and are not able to set "OR" conditions.
- For terminations and active statuses, select “All” to capture everyone paid within the period.

You can also set parameters around the existing fields you previously selected. For example, you can choose to filter "Payroll Type" to only show "contains" "regular" to exclude off-cycle payroll runs. You can also choose to layer these as well.

5. Scheduling Payroll Reports
If you want to automatically receive this report by email, click the Schedule option and set up a regular cadence. Remember that by default this is a one-time report, so for the scheduling option to appear you will need first to save your report. 
For more scheduling information, click here!
6. Advanced Options
- Grouping Options: Group payroll runs by any of your existing fields to create columns in your report. Remember to add additional fields: You'll need to add them to the "Basic" tab underneath the "Filters" section.
- If additional aggregation options are available, they will appear as well. It is recommended that users aggregate all desired fields at once to avoid reordering multiple times.
- For example, you can choose to group data in your report by "Gross Pay" and aggregate it by "Sum."
 Lastly, you can also view Permissions here to confirm who can view or edit the report. To make changes to this, you will need to visit the Permissions app from your Company Home Page.
- For example, you can choose to group data in your report by "Gross Pay" and aggregate it by "Sum."

7. Generating Your Report
Once your fields and filters are set, click Generate Report in the center of the screen. A progress bar will appear as the report is generated, which may take a moment for complex reports.
Once complete, your report will appear!

8. Saving & Downloading Your Report
After generating, download the report as a CSV using the Download button in the top-right corner. Save the report if you plan to use it regularly.
(Remember, by default all reports are "One Time Reports".)
Please note that downloading as a CSV will not retain aggregation settings. In order to do this you must download from the grid itself. Right-click on the grid & select export as XLS. Remember to save before doing this step to ensure all aggregation settings are in place.

Accessing Saved Payroll Reports
Once saved, you can access this report anytime under the Custom Reports section with updated payroll data.
Editing Existing Reports
Need to modify your report? Click the three dots next to the report name to Edit Report and make adjustments.
Crash Course
I
f you have any additional questions, please reach out to your GoCo CSM or email us at support@goco.io.
Happy reporting! 💚