GoCo’s Magic Docs let you digitally sign, complete, and track of all of your company’s HR documents in one place.
Here's how to get started:
-
Navigating to Documents
From your Company page click the "View" button on the Documents card (hint: there is also a shortcut to this on the left side menu as well!):

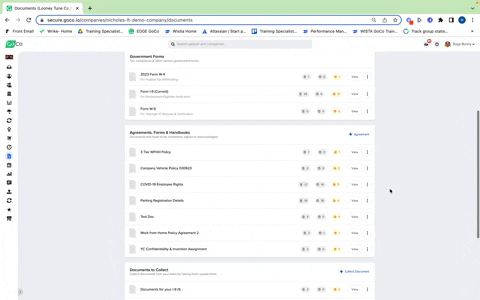
This will bring you to your Document Templates page. This page lists all of the documents you have in GoCo.
The documents are organized by folders in the following categories:
- Offer Letters & Contractor Agreements - Documents that a prospective employee or contractor needs to sign to accept a position with your company. These documents act as a gatekeeper to the onboarding process in GoCo. A prospective employee or contractor will not be able to advance to the onboarding section of the hiring workflow in GoCo without first completing these documents.
- Performance Reviews - Documents that are completed by the manager, employee, and /or any other persons involved in your group's performance review process. The structure of these documents doesn't vary from agreements, forms & handbooks but is included in its own category for convenience.
- Government Forms - documents such as the W-4, W-9, and I-9. You cannot edit these because they are defaults in GoCo.
- State Forms: located in a sub folder within Gov Forms. GoCo generates state tax forms as global templates so that you, the full-access admin, can populate and save these forms just like we do with the W-4 forms.
Employees will also have their specific form attached to their profile in the same folder.
- State Forms: located in a sub folder within Gov Forms. GoCo generates state tax forms as global templates so that you, the full-access admin, can populate and save these forms just like we do with the W-4 forms.
- Agreements, Forms & Handbooks - any other supporting documents you will send to new hires and current employees, such as a New Policy Agreement or an Employee Handbook.
- Documents to Collect - can be used for just about anything - but are mostly used for uploading certificates, training, licenses, etc. This category works a little differently than the rest of the Documents experience. Employees are presented with a place to upload a document, instead of them completing a document in GoCo like the above categories.
📌 Note you can rename these folders if you wish. Simply click the ellipses and select "Rename Folder" from the dropdown.
2. Add A Document
Simply click the "+" button under the desired category or the blue "+ Add Document" button at the top right hand of your screen.

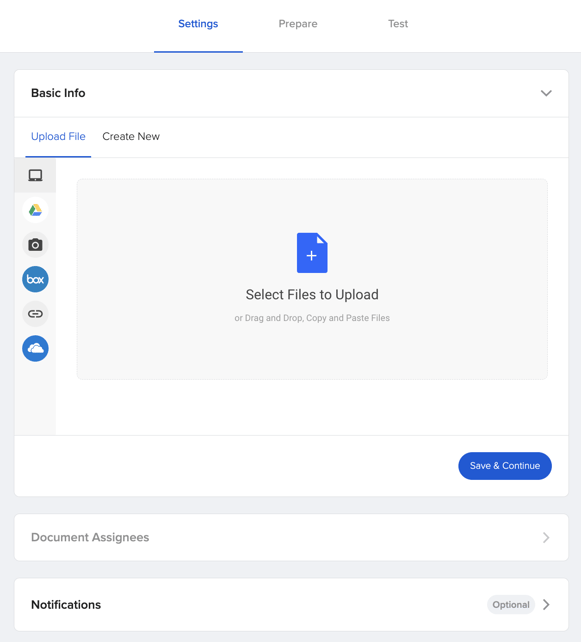
First, you will be prompted to either upload your own file or create new one. If you are uploading your own, please make sure they are exported as PDF or Word Documents. You can drag and drop files, upload from your computer, or even utilize cloud-based drives on the left-hand side.
Next, you will be prompted to name the document and confirm the document type. Please note that this is the last time you will be able to select whether the document is a performance review, agreement, etc.
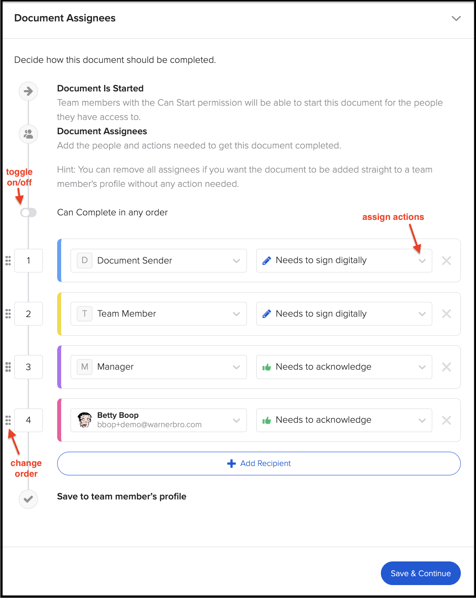
After naming your document, the last step before magitizing is selecting your Document Assignees, that is who will be involved with this Magic Doc and their level of interaction with it. You can assign actions to the Document Assignees such as collecting digital signatures, acknowledgments, and receiving a copy of the document. You can choose as many individuals as you want and even allow the document to be completed in any order. Just make sure to toggle this feature off or on!
- Needs to Sign Digitally - The Assignee will be required to electronically sign the document
- Needs to Acknowledge - The Assignee will be required to confirm that they reviewed the document & set an expiration date if needed
- Needs to Approve - The Assignee will be required to "Approve" or "Deny" the document & if denied they can leave notes for the previous assignee
- Receives a Copy - The Assignee will receive a copy but no action will be required
3. Magitize your Document!
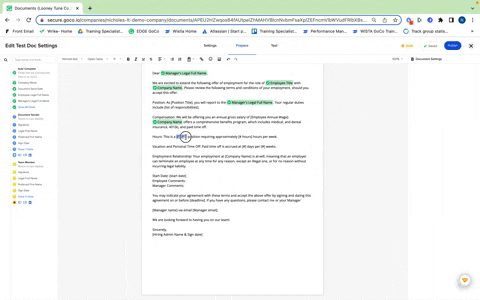
Use the left-hand sidebar to select those ✨ magic✨ fields that will pull directly from GoCo! Once you click, the field will populate in the document where the cursor was left.
*Note all auto-filled fields will be labeled in green.
Need to add a field that is custom or NOT in GoCo? Click on the text field, dropdown, or date option using the left-hand sidebar add feature! Once you click, the field will populate in the document where the cursor was left.
📌 Tip: If there is text in the document and you're looking to replace it with a magic field simply highlight it and select your magic field. This will replace the text with your selected magic field!
You will also notice that users are color-coded and numbered! Any field that is blue, with a 1 next to it in this example will be completed by the employee, yellow with a 2 is by the manager, so on and so forth!

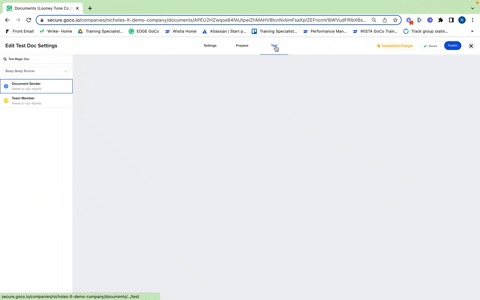
4. Testing and Publishing your Document
When you’re ready, testing your shiny new template is as easy as switching to the Test tab (top center, to the right of Prepare). You’ll get a live preview of what each user sees, what is required, and how fields are pulling into GoCo. You can always go back to the Prepare tab to make any adjustments. After confirming that all fields look good, you will Publish the document.
Publishing the document is a crucial step in this process. Your changes will not take effect until you complete this step. Keep in mind that publishing only updates the template moving forward—it will not affect any documents that have already been sent to employees.
5. Send your Document!
Congratulations, you're ready to send! To do so, click the gray "x" in the upper right-hand of the page after publishing. Next to your new document, you will see "View" and an "Ellipsis" button. Click on "Ellipsis" to load more options then click "Send To".
You can choose to send published documents to one employee, all employees, or even use the filters on the left-hand side to send by department, employment type, etc. The team members you send a Magic Doc to will receive a task to review and complete the document. You can even keep track of who has and hasn’t completed the document by clicking "View" next to the document name from the Docs page. If you hover over "Needs Action" or the green checkmark, you will see all completed and outstanding steps.

Editing a Document
Have an existing document you want to edit? Simply hit the ellipses button next to the document & select the "Edit Template" option from the drop-down.
Please note that pre-made templates by GoCo such as the "YC Offer Letter" will not display this option. 
Please email support@goco.io with any questions! 💚